In many cases, you may want to change the appearance of different elements on your website. Adding custom CSS can help you achieve this.
Adding custom CSS is actually an easy and a practical way to go if you want to customize the look of your WordPress website beyond what your theme and plugins offer. With just a few simple steps, you can tweak colors, fonts, spacing, and more to match your unique style.
Though there can be more than one method of adding custom CSS into your wordpress website, this article will guide you on the CSS addition method using your theme’s “customizer” area. This method is the easiest method for any beginner. Other methods include adding CSS using a child theme or using any code inserting plugin like the code snippet.
As already stated, for the sake of simplicity, we are following the method of using your theme’s built-in customizer to add your custom CSS.
1. Access the WordPress Customizer: Log in to your WordPress dashboard and navigate to “Appearance” » “Customize.” This will open the WordPress Customizer, where you can make various changes to your site’s design and layout. Or if you are already logged in and working on any page or post, you can see the “Customizer” option at the top admin bar of that page or post. You can click on that as well.
2. Find the Additional CSS Option: In the Customizer, look for the “Additional CSS” option. This is where you can add your custom CSS code without modifying your theme files directly.
3. Add Your Custom CSS Code: Click on the “Additional CSS” option, and you’ll see a box where you can enter your custom CSS code. Simply type or paste your CSS code into this box.
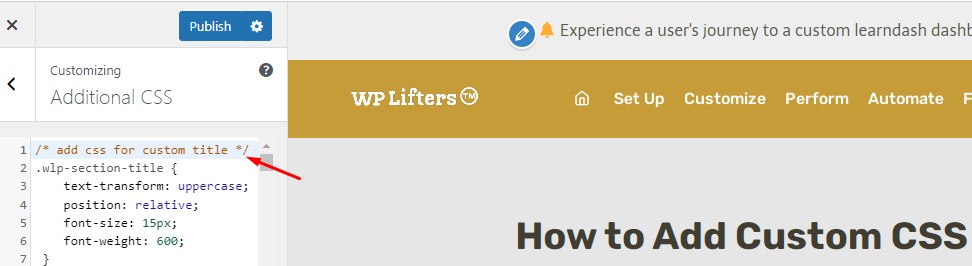
4. Preview Your Changes: As you add your custom CSS code, you’ll see your website’s live preview update in real-time. This allows you to see how your changes will look before applying them to your site.
5. Publish Your Changes: Once you’re happy with your custom CSS code and how it looks on your website, click the “Publish” button to save your changes and make them live on your site.
And that’s it! You’ve successfully added custom CSS to your WordPress site. Now you can continue to tweak and adjust your CSS code as needed to achieve the perfect look for your website.